Lately, I have been collecting patterns from online with different features I've never attempted before. I have since tried one or two and even worked out a few simpler versions of my own. It hasn't been easy, though it has been rewarding. Specially when you can wear what you made afterwards!
Study is going really well. I have passed my first module exams and two assessment pieces. The next module will be released in late January so over the next few weeks I will just concentrate on revision, while I practice a few tehniques on some of the patterns I have got.
Seeing something through to the final stages is such a great feeling! What have you made lately? :)
Sunday, December 14, 2014
Wednesday, November 26, 2014
Darts, Gathers and Resizing
Patterns have always been a little daunting to me, to say the least. Ever since I witnessed my Mum stressing out over cutting a pattern out herself when I was a little girl, I have had this inbuilt fear of cutting out fabric and realizing I cut it out wrong, or that I would miss important little nodes or dots.
Doing this dressmaking course is exciting. I am thrilled to be studying something that I love and pursuing a bit of a dream of mine - Making clothing for a living. Even though I will most likely make clothing on the side, it's still a wonderful thought that someday, someone will wear something I have made.
Although exciting, it also comes with confusion. I look at a pattern layout and understand what pieces go where.. But I struggle to understand how to make things bigger or smaller and where to add darts in this process.
All of this will become clear to me as I go on through the course, I know. I am trying not to get ahead of myself. Take deep breaths and embrace it. Anxiety can be bad like that. It fuels the fear and causes me to hyperventilate. I need to try and turn this into a fuel, so I can see it as an adventure, rather than something I want to avoid.
Tuesday, November 11, 2014
Study time!
I've had a little rest from blog writing.. Though I have still been sewing. After much consideration over the past year, I've finally chosen a course to study - a Certificate in Dressmaking & Pattern Cutting though an online college. This works best for me as I'm still at home with my busy little toddler!
I am both excited and a little nervous as it's been a few years since I last studied anything.. and even then it had nothing to do with sewing! So.. I will try and blog more often and share some little bits and pieces. I'm not sure how often I will get to sew anything other than for college, though I'll try and do a little something here and there!
I really love retro clothing and hope to do more with this style when it comes to making something of my own in the future. I love looking at all of the different patterns and styles though unfortunately I get a bit lost when I look at patterns. Hopefully within a few months I will have a better understanding of patterns and how to read them properly and the proper techniques involved. :)
So.. here goes :)
Monday, August 25, 2014
Fete & Website - All systems go!
I have been super busy as of late. First of all, I've been working on the website. It isn't spectacular, though I am working on it bit by bit. I don't want anything too difficult to work around, so I'm trying to keep it nice and simple, really.
The link is Ayla May Handmade Be sure to let me know what you think of it so far!
In other news, I am a sponsor at the Forest Lake State School Fete in September. I have donated some awesome cup holders and mug mats (coasters) for their handmade & craft stall.
I have also completed some new little projects.. Let's see some photos!


What do you think? I really love the blue around the edges on some of these.. So pretty! I hope you're all well and until next time, take care! :)
The link is Ayla May Handmade Be sure to let me know what you think of it so far!
In other news, I am a sponsor at the Forest Lake State School Fete in September. I have donated some awesome cup holders and mug mats (coasters) for their handmade & craft stall.
I have also completed some new little projects.. Let's see some photos!
What do you think? I really love the blue around the edges on some of these.. So pretty! I hope you're all well and until next time, take care! :)
Sunday, August 17, 2014
Wow! My new singer sewing machine has arrived and I think I am inlove! It runs so smoothly and so quietly compared to the Elna. . . It sings! Pun intended!
I have been asked to make heat packs for a preschool in Sydney to use during a meditation and relaxation group time so I have been busy researching different ways to make the heat packs. I am actually surprised with the amount of different fabrics and methods you can use. For example, you can use corduroy which will last well, though cotton breathes well in the microwave (and is one of the safest fabrics to use with heat) or you could even purchase a special wadding which can be microwaved and use it as a lining. I decided to go for the less expensive option and use cotton.
The problem with using cotton is that the fabric is so thin usually the heat seeps through it quickly and
A - loses heat fast so the heat packs don't stay warm for very long; and
B - may be too hot for small children to handle as the heat can escape faster than thicker fabrics.
So we decided to also make some covers for the heat packs, though obviously we can't use cotton for the cover as it wouldn't insulate very well and there wouldn't really be much point in having covers. So I went for a light flannel - this way the fabric breathes, lets the heat escape slowly and is thicker so offers more protection from the heat at the same time.

Here is a sample heat pack I made to test out sizing. The owl fabric is flannel and is slightly bigger than the insert so fits the heat pack snugly.
I have stitched most of them together, though need a little more fabric to finish off the last of the flannel covers. I am not filling these ones as postage for weight would be a fortune, so the preschool are filling the packs once they arrive in Sydney. I am thinking of selling some of these on the side too, so stay tuned.
P.S.. The new machine is awesome . . . Just in case you were wondering :)
I have been asked to make heat packs for a preschool in Sydney to use during a meditation and relaxation group time so I have been busy researching different ways to make the heat packs. I am actually surprised with the amount of different fabrics and methods you can use. For example, you can use corduroy which will last well, though cotton breathes well in the microwave (and is one of the safest fabrics to use with heat) or you could even purchase a special wadding which can be microwaved and use it as a lining. I decided to go for the less expensive option and use cotton.
The problem with using cotton is that the fabric is so thin usually the heat seeps through it quickly and
A - loses heat fast so the heat packs don't stay warm for very long; and
B - may be too hot for small children to handle as the heat can escape faster than thicker fabrics.
So we decided to also make some covers for the heat packs, though obviously we can't use cotton for the cover as it wouldn't insulate very well and there wouldn't really be much point in having covers. So I went for a light flannel - this way the fabric breathes, lets the heat escape slowly and is thicker so offers more protection from the heat at the same time.
Here is a sample heat pack I made to test out sizing. The owl fabric is flannel and is slightly bigger than the insert so fits the heat pack snugly.
I have stitched most of them together, though need a little more fabric to finish off the last of the flannel covers. I am not filling these ones as postage for weight would be a fortune, so the preschool are filling the packs once they arrive in Sydney. I am thinking of selling some of these on the side too, so stay tuned.
P.S.. The new machine is awesome . . . Just in case you were wondering :)
Thursday, August 14, 2014
Well, it is official. My Elna has now left the building and beginning a new life with another sewing enthusiast in a little country town. I already miss it! Isn't it funny that I am thinking about all of the little things I have made over the past eight months with that one little machine? So many dresses, shorts, pj's, headbands, skirts, bags, quilts.. I will miss her!
But on to bigger things! Tomorrow the next machine arrives and I already have a few projects lined up for her, let me tell you! :)
On another note. . . What do you think of the new banner for my little venture?

But on to bigger things! Tomorrow the next machine arrives and I already have a few projects lined up for her, let me tell you! :)
On another note. . . What do you think of the new banner for my little venture?
Wednesday, August 13, 2014
Waiting.
I am still here. I am just waiting. I just sold my beloved Elna Sewing Machine in order to help pay off my newest machine (yet to pick up). I have the next Peppa Pig quilt pinned and ready to quilt, though I need to wait until the new machine arrives before I can do any more.
I am, however, considering getting some more fabric and doing another circle quilt with different patterns, seeming as the last one turned out so well! :) I am super proud of my efforts!

And here it is. What do you think? I love the circle effect. So simple, yet it pops out at you. I even found the binding way easier this time around.
I found cutting the binding to 3" thick, rather than 2.5" much better as it gives me more room to get the binding in the right places. I'm sure over time I can do the 2.5" inch binding but for now, I am so happy with the results - I am just happy it went so well! :)
So, hopefully if all goes well, I might be able to pick up the new machine this weekend. For now, here's a pic of one.. I am not paying anywhere near as much as what this machine is worth brand new - otherwise there is no way I could get one! I am very lucky to have an awesome family member who is selling it to me for much less!

I am so excited! More pics to come soon I hope! . . .
I am, however, considering getting some more fabric and doing another circle quilt with different patterns, seeming as the last one turned out so well! :) I am super proud of my efforts!
And here it is. What do you think? I love the circle effect. So simple, yet it pops out at you. I even found the binding way easier this time around.
I found cutting the binding to 3" thick, rather than 2.5" much better as it gives me more room to get the binding in the right places. I'm sure over time I can do the 2.5" inch binding but for now, I am so happy with the results - I am just happy it went so well! :)
So, hopefully if all goes well, I might be able to pick up the new machine this weekend. For now, here's a pic of one.. I am not paying anywhere near as much as what this machine is worth brand new - otherwise there is no way I could get one! I am very lucky to have an awesome family member who is selling it to me for much less!
I am so excited! More pics to come soon I hope! . . .
Sunday, August 10, 2014
One down and One to go!
Wow! What an accomplishment! I am feeling pretty proud of myself right now, to say the least. I probably could have done better on the corners of the binding, though for my first quilt binding I am pretty happy with the results, although they're far from perfect!


Above: This is the first step of adding the binding, where it is attached by machine to the back of the quilt. In the second photo, you can see how I then turned the quilt right-side-up and stitched it down to create a finished binding for the edge all the way around.

Here is the finished quilt - Perfect size for a toddler!

Here is a close-up of one of the corners. As I said, not perfect and I got better towards the last corner, though I'm pretty happy for my first attempt!
Over the next week or so I will be working towards finishing the circle quilt I started working on a few weeks back (Need to finish up on stitching rows together and then binding). I also need to finish the second Peppa Pig quilt. I have everything I need now to complete these two quilts so more to come soon!
Thursday, August 7, 2014
This little pig went to market . . . .
Progress! I am still working away at the twin quilts, nervously. I say 'nervously' because it is the first real quilting project that I have set for myself (aside from my circle quilt - which I haven't forgotten!)
I went to the fabric store today and picked out some backing fabrics for all three quilts so hopefully I can begin to finish something off now.
Here are some progress shots..

This is a close up of the quilt top I decided to finish off first - If you look closely you can see the small zigzag stitching around all of the appliqued bits.

Then I added a 2.5" inch purple border to add a bit of contrast.. And a 5" border of the same background pink to finish it off.

Everything is then pinned together, ready to quilt!

When quilting, you need to start as close to the centre as you can and work your way out so the layers of the quilt stay as flat as possible.
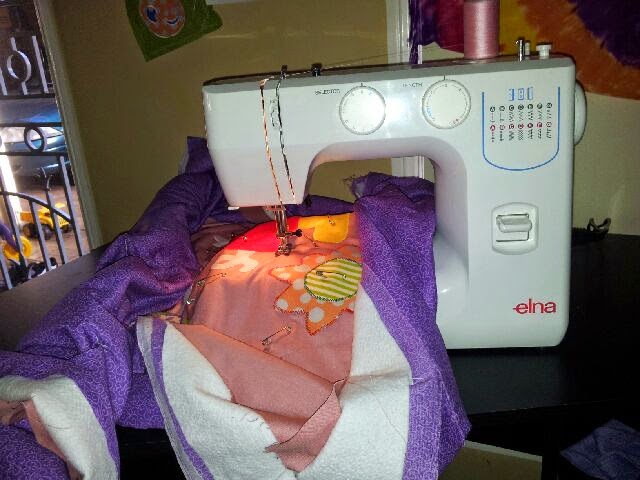
I have just started stitched a normal straight stitch, using a cotton as close to the background colour (pink) as possible, around all of the appliqued edges. . . More soon! :)
I went to the fabric store today and picked out some backing fabrics for all three quilts so hopefully I can begin to finish something off now.
Here are some progress shots..
This is a close up of the quilt top I decided to finish off first - If you look closely you can see the small zigzag stitching around all of the appliqued bits.
Then I added a 2.5" inch purple border to add a bit of contrast.. And a 5" border of the same background pink to finish it off.
Everything is then pinned together, ready to quilt!
When quilting, you need to start as close to the centre as you can and work your way out so the layers of the quilt stay as flat as possible.
I have just started stitched a normal straight stitch, using a cotton as close to the background colour (pink) as possible, around all of the appliqued edges. . . More soon! :)
Sunday, August 3, 2014
Who loves Peppa?
So I am trying something out here. I'm not 100% confident, though you have to try these things to see where they take you, so here I am.
I am working on a little something for some family friends - Twins infact - (In between finishing off my circle quilt) and wanted to show you how I'm putting it together. It can be fun.. and really interesting.... and somewhat frustrating too as it needs a fair bit of patience!
Peppa Pig is the project - and applique is the aim!
So I start by drawing the parts of Peppa that I need for the project on to some grease proof paper (this way a few errors are allowed...)


Then I begin to place the pieces out - like layering a cake really. You place down the boots, the tail and an arm, then the dress, another arm and the head and iron the pieces into place as you piece them so it stays put!

Then I start working on features of the face, like the nostrils, eyes and cheek. You can see the mouth in the next image...


I then decided to add a name at the top of the panel.. Though without any stencils, I had to freehand it.. Happy that I managed to remember some of my simple calligraphy skills from years ago!
So this is where I am up to right now, though later today hope I will have the second panel ready too.
Then, the applique begins!! More soon . . . .
I am working on a little something for some family friends - Twins infact - (In between finishing off my circle quilt) and wanted to show you how I'm putting it together. It can be fun.. and really interesting.... and somewhat frustrating too as it needs a fair bit of patience!
Peppa Pig is the project - and applique is the aim!
So I start by drawing the parts of Peppa that I need for the project on to some grease proof paper (this way a few errors are allowed...)
Then I copy them onto some vliesofix, cut them out and iron them onto the fabric (A little more to it than that, though the instructions are easy to grasp once you have done it a few times).
Then I begin to place the pieces out - like layering a cake really. You place down the boots, the tail and an arm, then the dress, another arm and the head and iron the pieces into place as you piece them so it stays put!
I then decided to add a name at the top of the panel.. Though without any stencils, I had to freehand it.. Happy that I managed to remember some of my simple calligraphy skills from years ago!
So this is where I am up to right now, though later today hope I will have the second panel ready too.
Then, the applique begins!! More soon . . . .
Friday, August 1, 2014
What's in a quilt?

What's that you ask?
What's in a quilt?
Hours and hours of patience, concentration and organizing, that's what! I don't think I have been so involved with a project before. I mean, anything you create takes some effort but this one has really taken the cake!
And I've enjoyed every minute of it, of course. So much so, I'd love to whip a few more with this pattern up as it is a lot faster than some of the other trial-and-error quilt patterns I've tried before.. but it just looks so good with all of the colours and patterns, don't you think?

All up I have appliqued 40 circles so far, though will do two more rows before I'm ready to start piecing it all together.

Wednesday, July 30, 2014
Time to get serious!
 I
came across a simple pattern a few days ago and it really grabbed
me. Too often I'll browse patterns or people's designs and think how
great it would be to give them a go, though when I see something that I
just 'have' to do.. That's when I know I'm on to something!
I
came across a simple pattern a few days ago and it really grabbed
me. Too often I'll browse patterns or people's designs and think how
great it would be to give them a go, though when I see something that I
just 'have' to do.. That's when I know I'm on to something!Here is a link to the pattern I am trying out.. Bijou Lovely Quilt Tutorial

If you are after a good adhesive for fabric so you can do some applique, try grabbing some vliesofix - It is so easy to use. . . All you need is an iron!

I will say though, that I have chosen to make my circles a little bigger than the measurement used in the tutorial and my squares are bigger too. I have been careful to add an extra inch to all sides of the squares too for seam allowance as I don't want the circles being too close to one another once the squares are sewn together.
.jpeg)
I was also very lucky to recently be given a walking foot for my Elna (it is a Singer foot, though is fairly universal), I have done a few practice runs on it, though can't wait to use it to quilt this one up in the end!
Until the next installment, happy sewing! :)
Sunday, July 27, 2014
I think I am done for today. Pretty happy with today's efforts though, with adding another row of squares and a few borders around all edges.
It could probably do with another border all the way around though not sure when I will get it done at this stage, or if I will just quilt it as is.
Off to the local fabric store tomorrow for some backing fabric and batting (and possibly some fabric to start my next project too!)
Here are some pics.. Please excuse the shot of my daughters room - It's a little chaotic! :)
Nearly done!
I have finished off on the squares now and am slowly just adding more to the sides as borders. I have decided I will finish this one off as a single bed size for my daughter's room and will possibly do a matching pillow case once I'm finished with the quilt.
At the moment the top just covers the top of her bed so a few extra bits as borders around the edging should make it bigger and hopefully, better! :)
Yet still to pick up some batting and a backing piece, though I'm hoping to do this over the next few days and finish it off completely.
I have already decided on the pattern for my next quilt. It is a bit simpler so shouldn't take me as long to do (as a beginner!) And the pattern looks amazing too!
Thinking about using some applique just to add a bit of 'pop' - It should be interesting, that's for sure! I'll hopefully add some more pics soon. . .
Friday, July 25, 2014
Learning new skills
Today I used some special iron-on applique paper/glue (I have actually forgotten the name..) and did my first applique trial.
You iron on the applique paper to some fabric, draw a design and cut it out, peel the paper off and then iron the design onto the fabric you want to use as a background. Then you sew around the edge carefully using a zigzag stitch, though this in itself took some time for me to figure out just how small my zigzag stitch should or shouldn't be!
But.. I got there! Here is a pic..

 See? Isn't it cute? :)
I also managed to complete another row of the quilt.. It's coming together slowly! Won't do much over the weekend, maybe another few squares though we have a busy few days ahead.
On we go! :)
You iron on the applique paper to some fabric, draw a design and cut it out, peel the paper off and then iron the design onto the fabric you want to use as a background. Then you sew around the edge carefully using a zigzag stitch, though this in itself took some time for me to figure out just how small my zigzag stitch should or shouldn't be!
But.. I got there! Here is a pic..
I also managed to complete another row of the quilt.. It's coming together slowly! Won't do much over the weekend, maybe another few squares though we have a busy few days ahead.
On we go! :)
Thursday, July 24, 2014
A quick sew
Okay, so I didn't get what I was hoping to do, done.
But... I DID manage to sew 2 rows together! Horray!! :)

And a closer view..

There are a few strips just out slightly though considering this is probably the biggest thing I have sewn I'm not that phased about it. I am getting pretty worried about having to sew the backing and batting together though and wondering how on earth my little Elna will handle such a big task!
More soon.....
But... I DID manage to sew 2 rows together! Horray!! :)
And a closer view..
There are a few strips just out slightly though considering this is probably the biggest thing I have sewn I'm not that phased about it. I am getting pretty worried about having to sew the backing and batting together though and wondering how on earth my little Elna will handle such a big task!
More soon.....
Tuesday, July 22, 2014
A quilt like this needs a name!
So far I am up to 19 squares on the 3 Dudes quilt - Which I am relabeling to the "Gypsy Quilt."
Don't you think it has a bit of a gypsy look? I am loving all of the colours which the photos are not doing much justice up until this point, unfortunately.
I planned on doing more than just 3 squares today though sleep got the better of me once my toddler was down for his afternoon nap. Was such a hectic morning I think I wore myself out!
Tomorrow afternoon is looking better to get some more done though, I hope.
I am thinking of doing maybe 24 squares all up, then doing a few rounds of borders around the edges of this quilt front. I was thinking of going and buying some fabric too do put between the squares and give that another go.. I am a little scared that I will mess it up but surely I have to get this right at some stage, right? It remains to be seen! Let's see what I can achieve tomorrow!
Monday, July 21, 2014
To border, or not to border?
I was busily working away today at my sewing desk and decided that it might be nice to share a photo of my little work area. It isn't much, basically a desk near a window. Though this house hasn't much room, I'm hoping one day to be able to move the desk in front of a window as there's something nice about sewing in front of an open window I think!
 Above: I have two machines, an Elna 1000 and a Toyota SL1T Overlocker (my baby!)
 Above: Sewing some strips together, in order to make up the squares.
Here are some squares already made up.. I have 16 squares made up in total now. I am getting a bit nervous because I know that in another few rows I will be looking at sewing them all together.. and adding a border before I quilt it all together (the part I am nervous about..)

This is what I have so far.. I probably won't sew all the squares in this sequence though it's fun to move them around and play with the colours and patterns!

I was thinking about "trying" to add a border around each square though it terrifies me after my last effort.. Which makes me think I should do it so then it won't worry me so much... Ho hum! Decisions, decisions!!
Here are some squares already made up.. I have 16 squares made up in total now. I am getting a bit nervous because I know that in another few rows I will be looking at sewing them all together.. and adding a border before I quilt it all together (the part I am nervous about..)
This is what I have so far.. I probably won't sew all the squares in this sequence though it's fun to move them around and play with the colours and patterns!
I was thinking about "trying" to add a border around each square though it terrifies me after my last effort.. Which makes me think I should do it so then it won't worry me so much... Ho hum! Decisions, decisions!!
Sunday, July 20, 2014
I am new to this blogging thing.. So I'll start off by telling you a little bit about the aim of this blog. I started sewing about seven months ago, when my mum bought me my first sewing machine. Up until then, I had only done simple sewing in high school as a teenager, though the basics were easy enough to recall.
I started watching tutorials on youtube on how to make simple things for the home, things like coasters and table runners which were pretty straight forward for a beginner.
I then moved on to making clothing for children and although I enjoy doing this, also love the challenge of learning something new now and then too.
So I am attempting to learn more about quilting.. Note the word 'attempting'.. I say this because my first attempt at actually doing a quilt for a friend didn't turn out at all like I had planned. And when I say that, I mean it didn't turn out at all! I set my sights on what I thought was a fairly easy design with panels and borders and yet had the hardest time putting it all together! It turned out to be a nightmare.. It looked like one too, sadly.
So I decided that I would not give up. Instead I decided to start a blog and I will (do my best to) update it regularly on whatever it is that I am working on or learning about. I'll try and upload photos of what I'm creating as I go, as often as I can too.
My first mission - To create a quilt with blocks only! I am using a design (You can view this on youtube if you search for Missouri Quilt Co. and search for '3 dudes quilt')..
I have already done a few squares so will upload some photos now.
Stay tuned.. I need as much support as I can get! :)
Here's the beginning at 4 squares..


More to come soon . . .
I started watching tutorials on youtube on how to make simple things for the home, things like coasters and table runners which were pretty straight forward for a beginner.
I then moved on to making clothing for children and although I enjoy doing this, also love the challenge of learning something new now and then too.
So I am attempting to learn more about quilting.. Note the word 'attempting'.. I say this because my first attempt at actually doing a quilt for a friend didn't turn out at all like I had planned. And when I say that, I mean it didn't turn out at all! I set my sights on what I thought was a fairly easy design with panels and borders and yet had the hardest time putting it all together! It turned out to be a nightmare.. It looked like one too, sadly.
So I decided that I would not give up. Instead I decided to start a blog and I will (do my best to) update it regularly on whatever it is that I am working on or learning about. I'll try and upload photos of what I'm creating as I go, as often as I can too.
My first mission - To create a quilt with blocks only! I am using a design (You can view this on youtube if you search for Missouri Quilt Co. and search for '3 dudes quilt')..
I have already done a few squares so will upload some photos now.
Stay tuned.. I need as much support as I can get! :)
Here's the beginning at 4 squares..
And at 9 squares..
More to come soon . . .
Subscribe to:
Posts (Atom)